
TL;DR
A closet can serve as a decent recording space if you focus on absorbing reflections, sealing gaps, and placing gear smartly. Moving the rig out of sight and earshot often beats endless foam panels for quiet and clarity.
Ever thought your tiny closet could be a legit recording spot? Think again. The secret isn’t just slapping foam everywhere — it’s smart placement, sealing gaps, and knowing when to move your gear out of sight. This isn’t about making your closet soundproof; it’s about making it sound good enough.
Whether you’re recording vocals, working on AI models, or just want a quieter space, understanding how to dampen reflections and block leaks is the game changer. Ready to transform that small, echoey box into a clean, focused sound zone? Let’s dive into the nuts and bolts.
Acoustic dampening
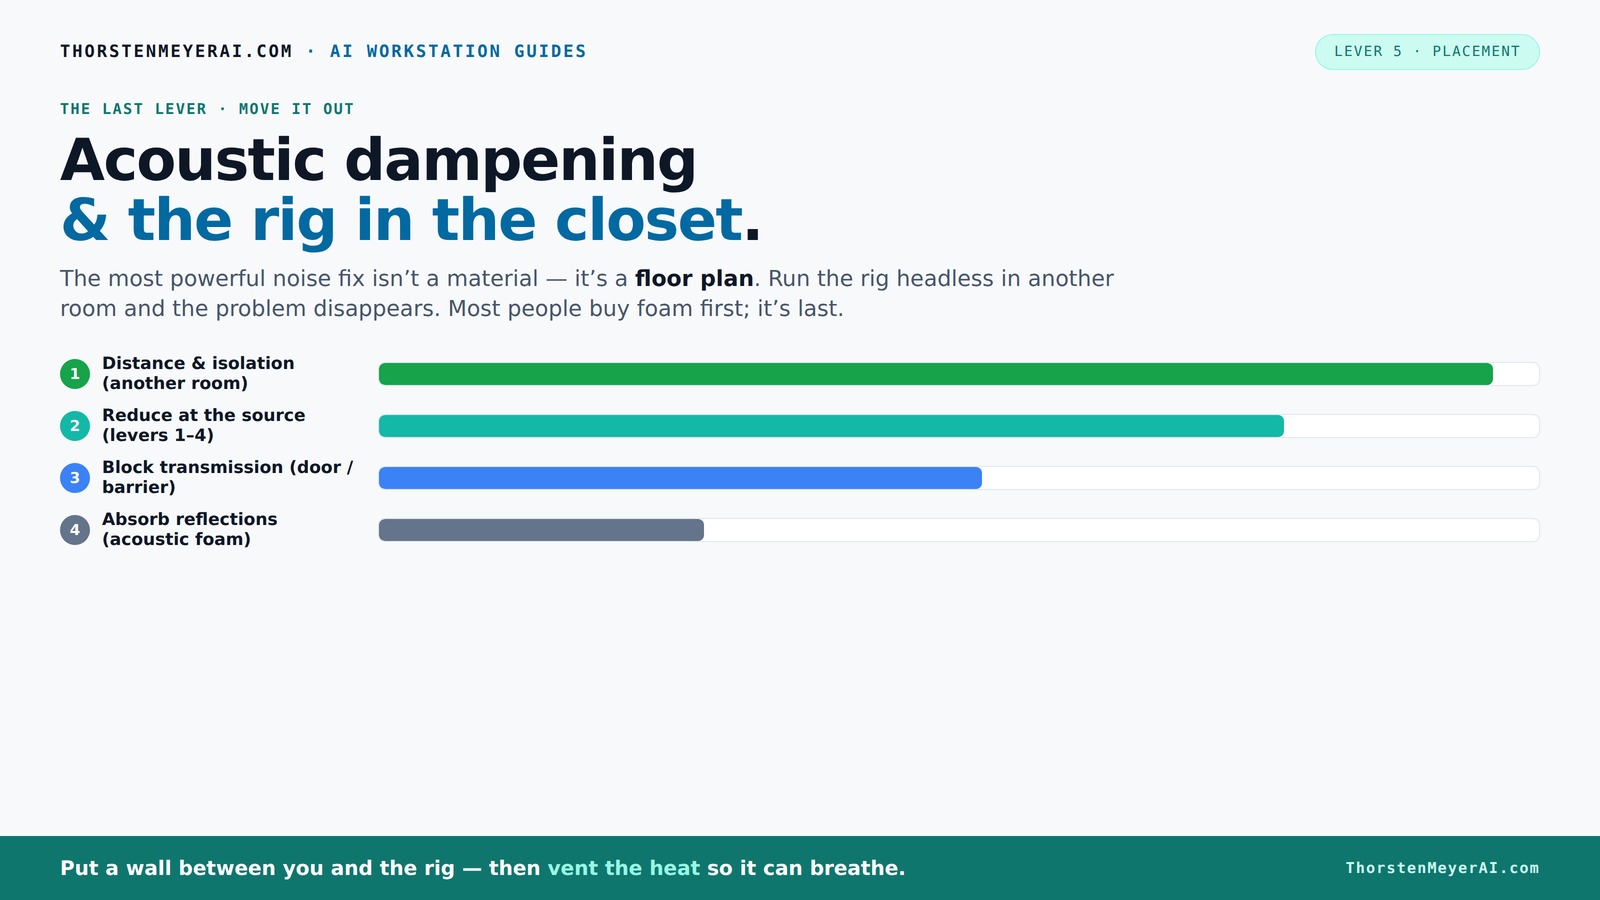
& the rig in the closet.
The most powerful noise fix isn’t a material — it’s a floor plan. A rig you can’t hear because it’s in another room beats any amount of foam. Tap the approaches in Part 1 to see what actually works.
(another room)
(levers 1–4)
(door / barrier)
(acoustic foam)
Contain the noise, not the heat
Key Takeaways
- Prioritize moving your rig out of the room; distance beats foam for noise reduction.
- Treat the first reflection points with foam or blankets for cleaner sound.
- Seal all gaps around doors and vents to prevent leaks.
- Use broad, layered treatment rather than just corner bass traps in small spaces.
- A closet can work well for recording or AI rigs if properly ventilated and sealed.

Focusound 52 Pack Acoustic Foam Panels 1" x 12" x 12" Sound Proof Foam Panles Soundproofing Noise Cancelling Wedge Panels for Home Office Recoding Studio with 300PCS Double-Side Adhesive
- Soundproofing Design: Triangular grooves for noise absorption
- Includes Adhesive Tape: 300pcs double-sided adhesive for easy installation
- Easy Shape Recovery: Soak in water to restore foam shape
As an affiliate, we earn on qualifying purchases.
As an affiliate, we earn on qualifying purchases.
Why a Closet Can Be Your Best Recording Secret (And When It’s Not)
A closet is a surprisingly good spot for recording — small space, high wall coverage, natural sound dampening. But it’s a double-edged sword. Too many parallel surfaces create standing waves and bass buildup. If you’re after crisp vocals or a clean AI inference rig, it’s all about managing those reflections and leaks.
Imagine singing in a tiny bathroom with tile walls — the echo can be wild. But add thick blankets and seal the door, and suddenly it’s a cozy vocal booth. The key is to understand what your space needs to turn chaos into clarity. For AI rigs, the goal is noise containment, not total silence.

Aokeo Microphone Isolation Shield, Foldable Mic Shield with Triple Sound Insulation, Reflection Filter with 3/8" and 5/8" Mic Threaded Mount for Recording Studio, Podcasts, Singing, and Broadcasting
- Soundproof Foam Front: Eliminates noise for clearer vocals
- Ventilated Metal Back Panel: Reduces sound reflection and echo
- Includes Desktop Stand: Easy setup for recording sessions
As an affiliate, we earn on qualifying purchases.
As an affiliate, we earn on qualifying purchases.
Acoustic Dampening vs. Soundproofing: What Really Matters
Acoustic dampening and soundproofing are two sides of the same coin but serve different purposes. Dampening reduces echo and reverb inside your closet—imagine soft blankets absorbing sound waves. Soundproofing, on the other hand, keeps sound from escaping—like adding mass and sealing gaps.
For a closet, you want a mix: absorb reflections with panels or blankets, and block leaks through sealing gaps and doors. This combo makes your space sound better and keeps noise from bothering others. It’s a balance: too much dampening without sealing is like muffling a conversation — it still leaks.

2 Pack Studio Monitor Isolation Pads for Large Speakers Sound Insulation Studio Foam Prevents Vibrations Acoustic Speaker Isolation Pad High Density Fits Most Stands
- Enhanced Sound Clarity: Reduces vibrations for cleaner sound
- Universal Compatibility: Fits most studio monitors and brands
- Adjustable Angle Design: Allows precise monitor positioning
As an affiliate, we earn on qualifying purchases.
As an affiliate, we earn on qualifying purchases.
Where to Place Foam, Blankets, and Panels for Best Results
Placement is everything. Start with the first reflection point — the wall directly in front of your mic where sound bounces back. Place foam or blankets there. For example, if you’re singing into a mic on your desk, treat the wall behind and the side wall facing you.
In a tiny closet, layering works well. Use foam panels at 2-4 inches thick for mid-high frequencies, and add bass traps in the corners if low-end buildup becomes an issue. Don’t forget the ceiling and floor — soft rugs and ceiling panels cut down on harsh reflections.
Remember: a blanket hung a few inches from the wall acts almost like a bass trap, soaking up low frequencies. Strategically placing soft materials near the source reduces echo and improves clarity.

Portable Vocal Booth – Soundproof Portable Recording Booth for Echo-Free Vocals, Home Recording Booth with Travel Bag for Voiceovers, Podcasts & Music (Black)
- Superior Sound Isolation: Absorbs up to 90% of noise
- Spacious One-Person Design: Fits creators up to 6.4 ft tall
- Easy 60-Second Setup: Quick pop-up assembly anywhere
As an affiliate, we earn on qualifying purchases.
As an affiliate, we earn on qualifying purchases.
Sealing Doors, Gaps, and Ventilation Without Losing Your Mind
Gaps around the door and ventilation are weak spots for sound leaks. Use weatherstripping or acoustic sealant to close cracks. For the door itself, add a dense curtain or an acoustic door sweep. It’s simple but effective.
Ventilation? You need airflow but also noise control. A quiet exhaust fan with ducting can pull hot air out while keeping sound in check. Aim for a setup that moves heat and keeps the noise down — a sealed closet with proper ventilation is a game changer.
Check your space with a phone app or a loudspeaker. Walk around and listen for leaks. Seal them up. Your recordings will thank you.
How Much Treatment Is Enough? When to Stop Adding Foam
In tiny closets, less is often more. Covering 20–30% of walls with acoustic panels can cut echo significantly. More isn’t always better — it can deaden your space too much or create uneven sound. Focus on treating the first reflection points, ceiling, and corners if needed.
For vocals, treat the wall behind the mic and the side walls facing you. Don’t forget to add a soft rug or blanket on the floor. If bass sounds boomy, add bass traps, but keep in mind that broad coverage often makes more difference than corner traps alone.
In a small closet, thick panels (4 inches) are overkill for most frequencies, but 2-inch foam is usually enough for high and mid frequencies. Use layered blankets for DIY solutions — they’re cheap and surprisingly effective.
Common Mistakes That Ruin Your Closet Studio (And How to Fix Them)
Don’t treat the entire closet evenly — target the first reflection points. Avoid hanging foam in random corners or covering everything. It’s a waste of resources and can deaden the space unevenly.
Also, don’t forget sealing gaps around the door and vents. A common mistake is to ignore leaks, which defeats all your dampening efforts.
Finally, remember: in a tiny closet, bass buildup is real. Use bass traps if low frequencies sound muddy, but don’t rely solely on corner trapping. Broad, layered treatment is more effective.
When a Closet Isn’t Enough — Time for Real Soundproofing
If your goal is total isolation, a closet alone won’t cut it. For true soundproofing, you need a dedicated booth with mass-loaded vinyl, double drywall, or professional soundproofing materials. But for most home projects, sealing gaps and adding targeted treatment gets you 90% there.
Think of the closet as a good start — if you need silence for critical recording or sensitive AI tasks, consider a purpose-built booth. Otherwise, smart placement plus sealing makes your closet work hard enough.
Frequently Asked Questions
Is a closet good enough for recording vocals?
Yes, if you treat the space properly. Focus on first reflection points, seal gaps, and add soft materials. Keep in mind that a small closet is more about reducing echo than total sound isolation. Understanding the tradeoffs—such as potential muffling or limited space—helps you optimize your setup for clarity without sacrificing too much natural sound or comfort.
What’s the difference between acoustic foam and soundproofing?
Acoustic foam absorbs sound waves to reduce echo and reflections inside a space, improving clarity. Soundproofing involves adding mass and sealing gaps to prevent sound from escaping or entering, which is essential for isolation. Combining both strategies yields the best results, but each has tradeoffs: foam can deaden sound if overused, and soundproofing can be costly and space-consuming.
Where should I place foam or panels in a closet booth?
Place foam at the first reflection points — the wall directly in front of your mic and the side walls facing you. Treat the ceiling and corners if low-frequency buildup causes issues. Proper placement ensures sound waves are absorbed before bouncing around, reducing echo and improving recording quality. Keep in mind that strategic placement is more effective than covering all surfaces indiscriminately, which can lead to uneven sound and muffled recordings.
Do I need bass traps in a small closet?
In tiny spaces, broad wall coverage and soft materials often mitigate bass issues. Bass traps are more critical if you notice muddy low frequencies or standing waves that cause boomy sound. They’re especially useful in larger or more reflective closets, but in small, well-treated spaces, proper placement of absorption panels usually suffices. Over-trapping can deaden the sound or create uneven frequency response, so use bass traps selectively based on your room’s acoustic behavior.
How much of the closet walls should be covered?
Cover about 20-30% of the walls with acoustic panels or blankets, focusing on the first reflection points rather than entire walls. This targeted approach reduces echo and improves clarity without overly deadening the space. Excessive coverage can make the room sound dull and hinder natural resonance, so balance is key. Prioritize treating the most reflective surfaces first for the best results within a small space.
Conclusion
Sometimes, the best way to quiet a noisy rig is to hide it. Moving your setup into another room or closet, combined with smart treatment and sealing, makes a huge difference. Your recordings and work environment will sound clearer — and your sanity stays intact.
Remember, a little planning and targeted effort turn a tiny, echoey closet into a surprisingly effective studio. So next time you’re annoyed by noise, ask yourself: can I just put it somewhere else? The answer might be yes, and the results will speak for themselves.