
To use horizontal lens shift for off-center placement, start by positioning your projector as close to center as possible. Then, activate the horizontal lens shift feature to slide the image sideways without moving the projector itself. This adjustment helps you avoid digital keystone corrections, maintaining picture quality. Keep in mind that proper use of lens shift guarantees a sharp, distortion-free image. Continue exploring to discover tips that can make your setup even better.
Key Takeaways
- Use the projector’s horizontal lens shift control to move the image sideways without physically repositioning the projector.
- Position the projector as close to the center as possible, then adjust the lens shift to align the image properly.
- Avoid excessive keystone correction by relying on lens shift for off-center placement to preserve image quality.
- Fine-tune the horizontal lens shift to achieve a symmetrical, distortion-free image on your screen.
- Combine minimal keystone correction with lens shift for optimal, high-quality projection when off-center.

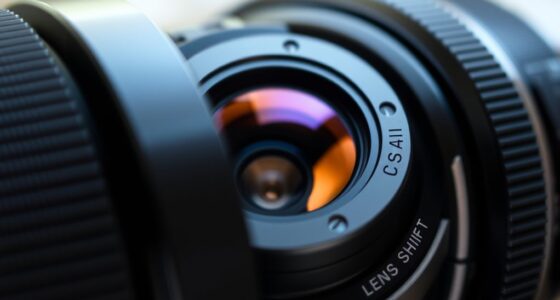
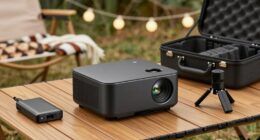
Have you ever noticed how an off-center placement can dramatically change the look and feel of a design? When you position a projector or display slightly off to the side, it can create a striking visual effect, but it also introduces challenges like keystone correction and image distortion. Understanding how to use horizontal lens shift effectively allows you to leverage off-center placement without sacrificing image quality or accuracy.
Off-center projector placement can be visually striking when paired with proper lens shift adjustments.
When your projector has a horizontal lens shift feature, it gives you the ability to adjust the image position without moving the device itself. This is particularly useful when your room layout doesn’t allow for perfect, centered placement. Instead of physically moving the projector, you can shift the lens horizontally to align the image with your screen or wall. This keeps the projector’s position constant while adjusting the image’s position, reducing the need for complex mounting or repositioning. It’s a straightforward way to achieve an off-center setup while maintaining a clean, professional look.
However, shifting the image horizontally can sometimes lead to keystone correction being necessary. Keystone correction is a digital adjustment that compensates for the trapezoidal distortion caused when the projector isn’t perfectly aligned with the screen. While keystone correction can fix the shape of your image, it can also introduce some image distortion if overused. That’s why leveraging the physical adjustment of lens shift is preferable; it reduces reliance on digital correction, which can sometimes compromise image clarity and sharpness.
Using horizontal lens shift thoughtfully allows you to avoid some of the pitfalls associated with off-center placement. When you align the projector as much as possible with the center of your screen, you minimize the amount of keystone correction needed. This maintains the image’s natural proportions and sharpness, ensuring a crisp, distortion-free picture. It’s a balancing act—using the lens shift to position the image properly while keeping digital corrections to a minimum.
In practical terms, when setting up your projector, start by positioning it as centrally as possible. Use the horizontal lens shift to fine-tune the image position rather than relying solely on keystone correction. This approach preserves the original image quality, reduces distortion, and produces a more accurate, visually pleasing projection. Remember, the key is to use lens shift to your advantage, making off-center placement not just possible but also effective without compromising the integrity of the image. This way, you enjoy a flexible setup with sharp, correctly proportioned visuals every time.
A key advantage of lens shift is that it allows for precise image positioning, minimizing the need for digital corrections that can degrade picture quality.

XGIMI Horizon 20 Max 4K Projector Triple Laser Home Theater, 5700 ISO Lumens, Google TV with Licensed Netflix, Optical Zoom Lens Shift, IMAX Enhanced, Dolby Vision, 20000:1 Contrast,1ms Input Lag
Lossless Optics: Flexible lens shift and optical zoom give you more freedom in setup—without sacrificing clarity. Enjoy crisp,…
As an affiliate, we earn on qualifying purchases.
As an affiliate, we earn on qualifying purchases.
Frequently Asked Questions
Can Horizontal Lens Shift Correct Keystone Distortion?
Horizontal lens shift can’t directly correct keystone distortion, but it helps with lens alignment, ensuring your projector is properly positioned. By adjusting the lens shift, you can move the image horizontally without physically moving the projector, reducing the need for keystone correction. This maintains image quality and keeps the picture straight. Just remember, lens shift is best for alignment; for keystone distortion, use keystone correction features.
Is Horizontal Lens Shift Adjustable During Video Playback?
Yes, you can usually adjust horizontal lens shift during video playback, depending on your projector’s features. This adjustment helps you fine-tune lens alignment and image positioning without interrupting your viewing. Simply access the lens shift menu, and while the video plays, make small adjustments to ensure the image stays perfectly aligned. This real-time control allows you to optimize your picture quality and maintain an ideal viewing experience.
Does Lens Shift Affect Image Brightness or Contrast?
Lens shift primarily affects image positioning, not brightness impact or contrast effects. When you adjust horizontal lens shift, it doesn’t typically alter the brightness or contrast of the image because it moves the lens rather than changing the projector’s light output or image processing. However, extreme shifts might cause slight vignetting or uneven lighting, so verify your lens is centered for maximum brightness and contrast performance without compromising image quality.
Can Lens Shift Be Used for Multiple Screen Sizes?
Yes, lens shift can be used for multiple screen sizes. When you adjust the mount, you can reposition the projector slightly to match different screen dimensions. This makes screen calibration easier, ensuring a centered image without physically moving the projector. Just remember to fine-tune the mount adjustment each time you change screen sizes to maintain ideal image quality and alignment.
What Safety Precautions Are Needed When Adjusting Lens Shift?
You should always follow safety guidelines, guarantee the mount is secure, and handle the projector carefully when adjusting the lens shift. Before making a mount adjustment, turn off the device and unplug it to prevent electric shock. Use proper tools and avoid overextending the lens shift to prevent damage. Maintain a stable stance, work in a clear area, and double-check all adjustments to keep yourself safe and protect your equipment.

Aurzen Ceiling Projector Mount Bracket, 360° Rotation & 90° Tilt, Adjustable 9"-15" Length, ¼-Inch Screw, Compatible with TMY, HAPPRUN, Yaber, Epson & Most Projectors
Note: Not compatible with Aurzen D1 MAX
As an affiliate, we earn on qualifying purchases.
As an affiliate, we earn on qualifying purchases.
Conclusion
Now that you know how to utilize horizontal lens shift, you’re closer than ever to perfecting your viewing setup. But what if I told you there’s one more trick that could take your experience to the next level? Stay tuned, because mastering this last detail might just change everything—yet, it’s a secret few discover easily. Are you ready to unleash the full potential of your projector? The next step could surprise you.

Kaisi Professional Electronics Opening Pry Tool Repair Kit with Metal Spudger Non-Abrasive Nylon Spudgers and Anti-Static Tweezers for Cellphone iPhone Laptops Tablets and More, 20 Piece
Kaisi 20 pcs opening pry tools kit for smart phone,laptop,computer tablet,electronics, apple watch, iPad, iPod, Macbook, computer, LCD…
As an affiliate, we earn on qualifying purchases.
As an affiliate, we earn on qualifying purchases.

PCMD, LLC. Projector Ceiling Mount Compatible with Epson Home Cinema 4000 4010 Pro Cinema 4050 with Lateral Shift Coupling (12-Inch Extension)
100% Aircraft Aluminum (6061-T6) Construction
As an affiliate, we earn on qualifying purchases.
As an affiliate, we earn on qualifying purchases.