
To enhance your projector room’s atmosphere, consider installing a DIY star ceiling using dark, matte materials like blackout fabric or paint to absorb excess light. Incorporate small LED lights or fiber optic strands for pinpoint star effects, and experiment with dimmable lighting for mood control. Adding projectors or spotlights can create shimmering or moving star patterns, layering effects for realism. Keep planning and experimenting to achieve a mesmerizing night sky—if you’re curious, you’ll discover more tips ahead.
Key Takeaways
- Use dark, matte ceiling materials like blackout fabric or paint to minimize reflections and enhance star visibility.
- Incorporate small LED lights or fiber optic strands to create realistic, twinkling star effects.
- Experiment with strategic placement and color of lights to set a tranquil or vibrant mood.
- Combine lighting with glow-in-the-dark paints or phosphorescent materials for a soft, lasting glow.
- Plan your design carefully, balancing materials and lighting effects for an immersive, mesmerizing projector room ambiance.

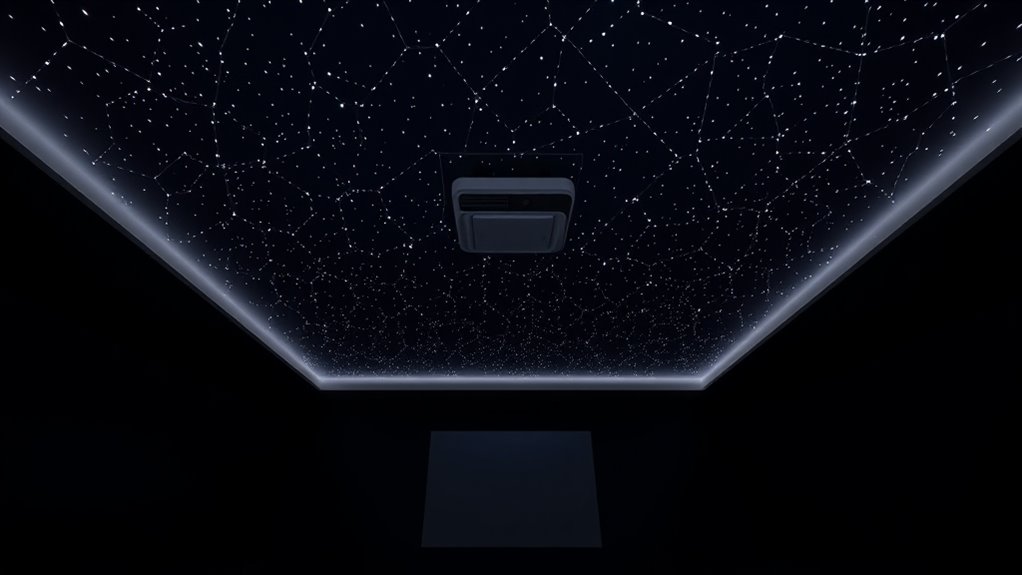
Ever wondered how to transform your space into a magical night sky? Creating a DIY star ceiling or decor is a fantastic way to elevate your projector room and craft an immersive atmosphere. The key to achieving this effect lies in understanding how lighting effects and material selection work together to produce a realistic and mesmerizing night sky. When planning your project, think about how different lighting effects can mimic the twinkle and depth of stars. Soft, pinpoint lighting can simulate distant stars, while subtle color variations add a sense of realism. Using fiber optic strands or small LED lights allows you to create precise points of light that resemble stars, and you can vary their brightness to add depth and movement. Incorporating dimmable lights gives you control over the ambiance, letting you switch from a subtle glow to a vibrant night sky as desired. Additionally, exploring regional resources can provide inspiration and access to specialized materials that enhance the authenticity of your design.
Material selection plays an essential role in how effective your star ceiling will look. Opt for a dark, matte ceiling material that minimizes reflections, helping the lights stand out sharply against the background. Blackout fabric or paint, for example, works well because it absorbs excess light and creates a deep canvas for your stars. For added realism, consider using glow-in-the-dark paints or phosphorescent materials for some stars, which can glow softly even after the lights are off, enhancing the feeling of a true night sky. When choosing your materials, think about durability and ease of installation. Flexible materials like fabric or lightweight panels make it easier to install and customize your design, while sturdy options ensure longevity.
Lighting effects can be further enhanced with the use of projectors or small spotlights, which can cast subtle glimmers or moving star patterns across the ceiling. Combining this with carefully selected materials will give your project a layered, dynamic appearance. Remember, the goal is to make your ceiling feel like a window to the universe, so take your time experimenting with different lighting effects and materials to get the perfect look. Keep in mind that the placement of your lights and the color of your materials can dramatically change the mood, from tranquil and serene to lively and energetic. With thoughtful planning and a little creativity, your DIY star ceiling can become a stunning feature that transforms your projector room into a mesmerizing night sky, inviting wonder and awe every time you step inside.
Frequently Asked Questions
What Materials Are Safest for DIY Star Ceiling Projects?
You should choose non-toxic paints to guarantee safety, especially if you’ll be in the room often. Use LED lighting for energy efficiency and minimal heat, reducing fire risk. Select safe, low-VOC paints and avoid harsh chemicals. When installing, ensure proper ventilation and handle materials carefully. By prioritizing non-toxic paints and LED lighting, you create a beautiful, safe star ceiling that enhances your space without health concerns.
How Can I Improve the Durability of DIY Star Ceiling Decor?
To improve the durability of your DIY star ceiling decor, focus on material reinforcement by using sturdy backing materials like foam board or lightweight plywood, and sealants to prevent wear. Regular maintenance tips include cleaning gently with a soft cloth and inspecting for cracks or loose fixtures. Applying a protective coat or sealant enhances longevity, ensuring your star ceiling stays beautiful and intact for years to come.
Are There Any Safety Concerns With Glow-In-The-Dark Paints?
Glow-in-the-dark paints can be safe if you choose non-toxic, paint-safe options specifically designed for indoor use. Always check the label for paint safety and guarantee proper ventilation during application. Avoid getting these paints on your skin or inhaling fumes, especially in poorly ventilated areas. It’s best to wear gloves and a mask. Properly sealed and tested paints minimize safety risks, making your star ceiling both beautiful and safe.
How Do I Customize the Star Pattern for My Space?
To customize your star pattern, start by sketching your design ideas, then use stencils or freehand draw your personalized galaxy designs on your ceiling. You can create custom star patterns by varying star sizes and spacing, or add unique elements like planets or nebulae for a personalized touch. Use glow-in-the-dark paint or tiny LED lights to bring your design to life, making your space uniquely yours.
Can I Remove or Change the Star Decals Easily Later?
Yes, you can remove or change your star decals easily later. For decal removal, gently peel them off, and use adhesive remover if needed to eliminate any residue. If you prefer a different look, you can also paint over the decals with a matching color to update the design. This way, you keep your options flexible without damaging your ceiling, making future changes simple and hassle-free.
Conclusion
Creating your own star ceiling or decor can subtly transform your projector room into a tranquil retreat. With a little effort and creativity, you’ll craft an ambiance that gently invites relaxation and wonder. It’s a delicate dance of light and imagination, turning an ordinary space into something truly special. So, embrace the process and let your personal touch softly illuminate your evenings, making every movie night feel like a serene escape into the stars.