
To calibrate with test patterns, start by displaying the pattern clearly on your monitor or TV. Analyze color accuracy, grayscale, and geometry features, then modify settings like color temperature, gamma, brightness, and contrast to match the pattern’s references. Use geometric shapes and alignment grids to verify proper shape and size. Make small adjustments and review repeatedly until the image looks balanced and accurate. Keep going for detailed steps to perfect your calibration process.
Key Takeaways
- Display the test pattern fully on your device, ensuring it fills the screen without black borders or cutoffs.
- Analyze color accuracy, grayscale, and geometric shapes to identify areas needing adjustment.
- Adjust color temperature, gamma, and saturation incrementally to match the test pattern’s reference values.
- Fine-tune geometry and alignment using grids and shapes to correct distortion and ensure proper shape proportions.
- Repeatedly compare your adjustments to the test pattern, making small changes for precise calibration.

Test pattern calibration is an essential step in guaranteeing your display or imaging device delivers accurate and consistent visuals. When you calibrate using test patterns, you’re fundamentally fine-tuning your device to achieve the best possible performance, especially in terms of color accuracy and display alignment. These elements are key because they directly impact how images, videos, or graphics appear, whether for professional editing, gaming, or everyday viewing. Proper calibration helps eliminate issues like color cast, uneven brightness, or misaligned pixels, giving you confidence that what you see on screen truly reflects the intended output.
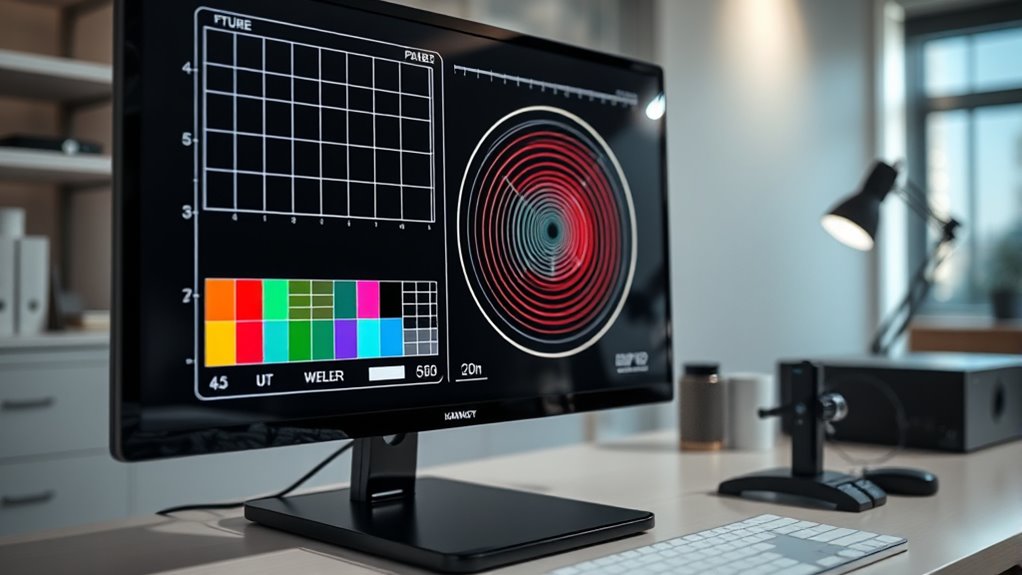
To start, you need a reliable test pattern designed specifically for calibration purposes. These patterns typically feature color bars, grayscale ramps, geometric shapes, and alignment grids. As you display the test pattern, your goal is to analyze and adjust settings so that the colors are true to life, the grayscale appears smooth without any color tints, and geometric shapes are perfectly aligned without distortion. When it comes to color accuracy, you should focus on adjusting your monitor’s or projector’s color temperature, gamma, and saturation settings. This guarantees that hues like reds, greens, and blues are rendered correctly, which is especially important for photo editing or color grading work.
Display alignment involves fine-tuning your device’s geometry and positioning. Using alignment grids or geometric shapes on the test pattern, you can check for distortion, pin cushioning, or stretching. If the shapes appear skewed or misaligned, you can adjust the device’s geometry controls, such as tilt, height, or keystone correction, to straighten the image. Proper display alignment ensures that all elements are proportionate and that the image fills the screen evenly, avoiding black borders or cutoffs. It’s also important to verify that the brightness and contrast are balanced so that details in shadows and highlights are visible without washing out or crushing details.
Throughout the calibration process, it’s important to be methodical. Make small, incremental adjustments, then step back and assess the visual output. Use your test pattern as a reference, noting how changes impact color fidelity and alignment. Some advanced calibration tools and software can automate parts of this process, providing precise measurements and recommendations, but manual adjustments still require your keen eye for detail. Remember, the goal is to create a visually harmonious display that accurately reproduces colors and maintains proper geometry. Additionally, understanding industry trends can help you stay updated on the latest calibration techniques and tools for optimal results.

GME PG-28 Portable Video Test Pattern Generator for TV and NTSC Monitor, Designed and Engineered in The USA
【TEST, CALIBRATE, SERVICE, TROUBLESHOOT TV AND NTSC MONITOR】 Handheld video test pattern generator that generates a wide variety…
As an affiliate, we earn on qualifying purchases.
As an affiliate, we earn on qualifying purchases.
Frequently Asked Questions
How Often Should I Recalibrate Using Test Patterns?
You should recalibrate using test patterns at least once every six months as part of your maintenance routines. Regular calibration guarantees your display stays accurate and consistent over time. If you notice color shifts, brightness issues, or other discrepancies, increase the frequency of recalibration. Consistent calibration frequency helps prevent long-term damage and maintains ideal image quality, making it a vital part of your overall maintenance routine.
Can I Calibrate My Device Without Professional Tools?
You can definitely try DIY calibration without professional tools, but don’t expect magic! With just calibration software and test patterns, you’ll get surprisingly close to professional results. Imagine turning your device into a finely tuned masterpiece without breaking the bank—it’s almost like magic! Just follow easy guides online, use your calibration software, and you’re set. Remember, patience is key—you’ll be amazed at what a little effort can achieve!
What Common Mistakes Should I Avoid During Calibration?
You should avoid rushing the calibration process, as it can affect color accuracy and gray scale. Don’t ignore the display’s ambient lighting, which influences your perception. Using incorrect test patterns or skipping multiple calibration steps also leads to errors. Always double-check your settings and make sure your device is stable during calibration. These mistakes can compromise the overall quality, making your display less accurate and less enjoyable to use.
Are There Specific Test Patterns for Different Display Types?
Yes, different display types often require specific test patterns for accurate calibration. For example, OLED screens benefit from patterns that highlight contrast and color uniformity, while LCDs need test patterns emphasizing brightness and black levels. Always choose test pattern specificity based on your display type to guarantee precise calibration. Using the right patterns helps you avoid errors and achieve ideal picture quality tailored to your screen’s unique characteristics.
How Do Environmental Factors Affect Calibration Accuracy?
Environmental factors can totally sabotage your calibration! Ambient interference from bright lights, reflections, or even nearby electronics can throw off your adjustments, making colors look wrong or contrast uneven. Plus, calibration drift caused by temperature changes or humidity can sneak in over time, requiring you to recalibrate more often. To keep your display perfectly tuned, minimize ambient interference and regularly check for calibration drift—your visuals will thank you!

Calibrite Display 123 Monitor Calibration Colorimeter for Photo Editing and Color Accurate Viewing, Easy 1 2 3 Software Workflow, USB C Connection, and Before and After Check, Supports 2 Displays
SPECIFICATIONS: Monitor calibration colorimeter with Easy 1 2 3 software workflow, USB C connection, compact body approx. 34mm…
As an affiliate, we earn on qualifying purchases.
As an affiliate, we earn on qualifying purchases.
Conclusion
Now that you know how to calibrate with test patterns, you’ll guarantee your display looks its best. Did you know that properly calibrated screens can improve color accuracy by up to 20%? This means sharper images, richer colors, and a better viewing experience overall. So, take a few minutes to follow these steps—you’ll notice the difference immediately. Calibration isn’t just technical; it’s about enjoying your content the way it’s meant to be seen.

Multi-Scenario Electrostatic Field Distribution Test Kit
This electrostatic field line demonstrator visualizes the magnitude and directional vector of electric field intensity at all spatial…
As an affiliate, we earn on qualifying purchases.
As an affiliate, we earn on qualifying purchases.
professional monitor calibration software
As an affiliate, we earn on qualifying purchases.
As an affiliate, we earn on qualifying purchases.